

Circa 1824 Historic Home Kitchen Remodel Project
 Post by Stacey Walker. Stacey mostly works behind the scenes for Greenbrook Design, managing day to day operations, marketing, sourcing product and keeping the showroom beautifully designed. Stacey also does interior design & home styling for a select number of clients. Find out more about Stacey here.
We are excited to share this recent kitchen remodel from a historic home that was built in 1824. This project presented us with some unique design challenges that we were able to overcome resulting in a beautiful finished product and a very well functioning kitchen.
Also known as Antebellum architecture, this property not only gives us an intimate look at how people once lived in this southern region but also shows characteristics and style of a stunning southern design which remains rich in history.
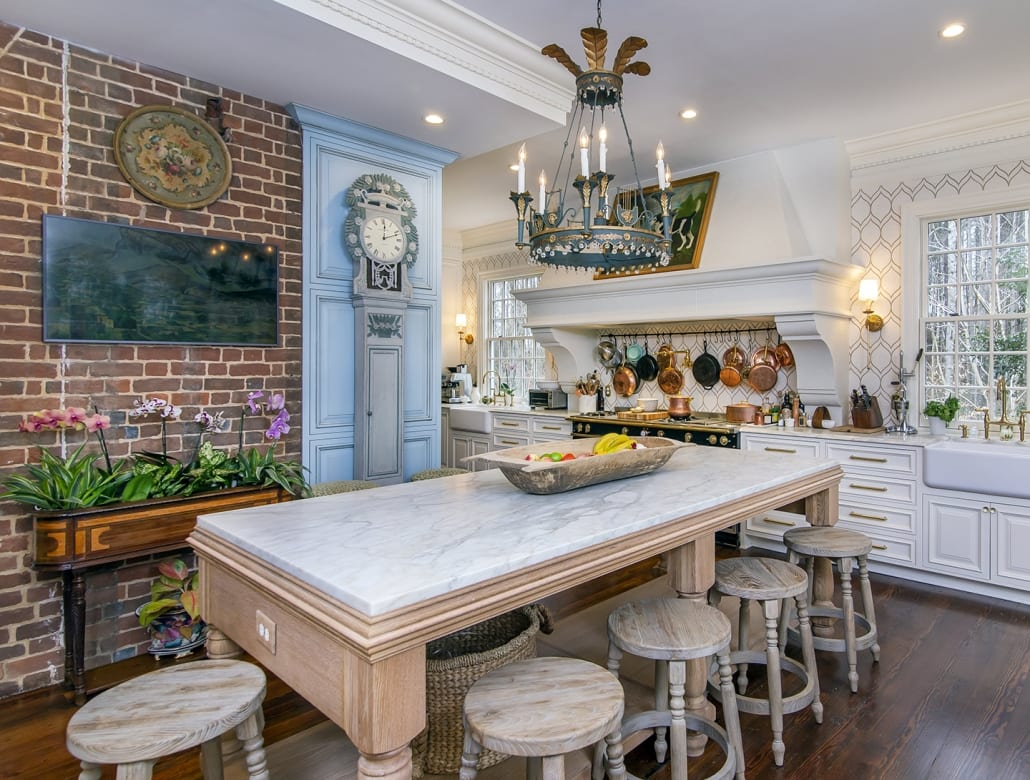
Completed Project
Design Challenge: The Floor Plan
Keeping the existing floor plan was not ideal for this particular kitchen layout. We needed to incorporate a washer and dryer into the space. Since it was an older home, there were not a lot of areas to “fit” this in. For this design solution, combining the kitchen and laundry rooms was the best option.
Before
The current laundry room and kitchen were part of an addition that was built onto the home in the 70’s. Wanting to stay true to the original layout, we followed closely to what was already there but opened up the space by removing the wall between the kitchen and laundry room. Based on the way that addition was built, it allowed us to open up the entire area.
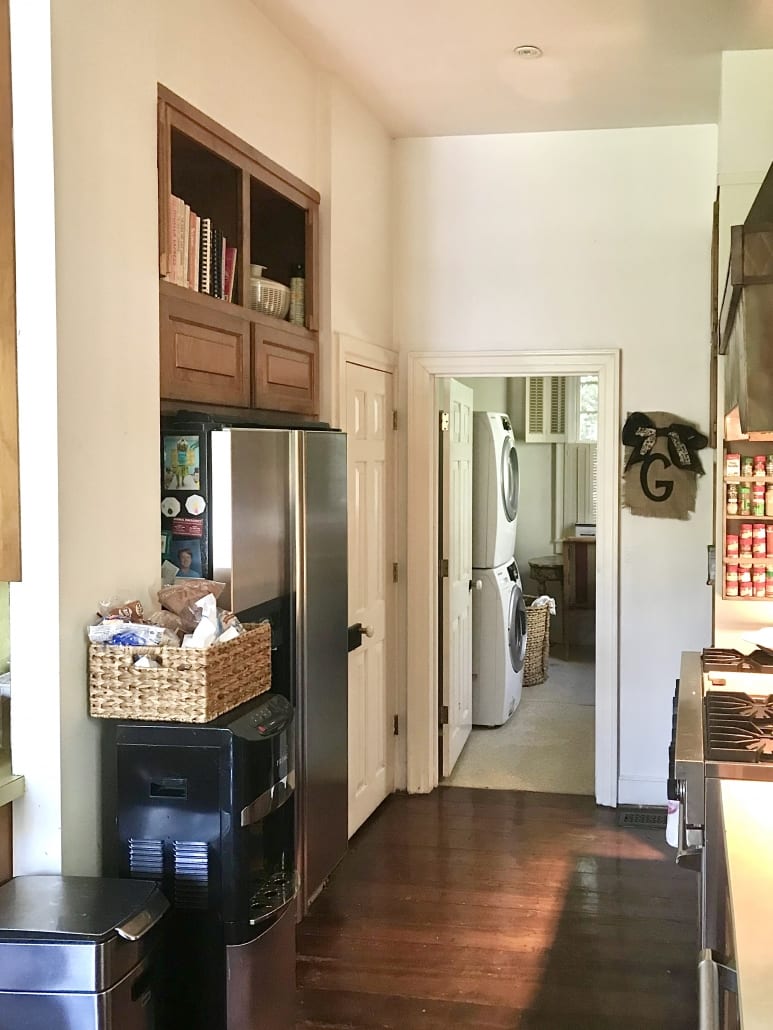
Before view from Kitchen to Laundry Room
New floor plan
With the vision of removing walls, this was the newly revised floor plan, showing how much space we would gain as well as a more unified space.
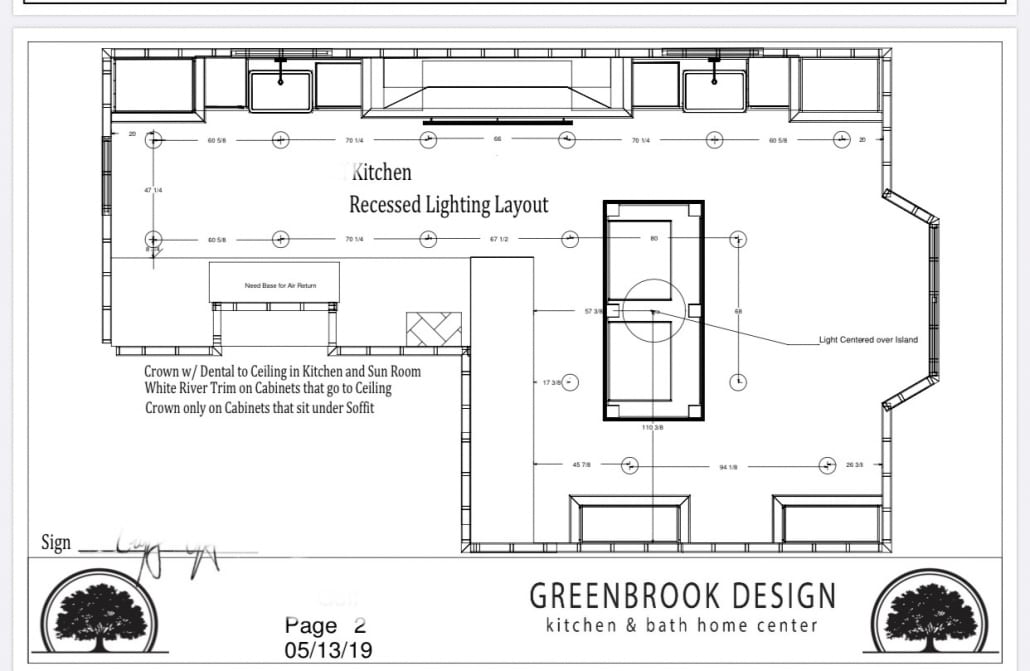
New Floor Plan
The Design Process
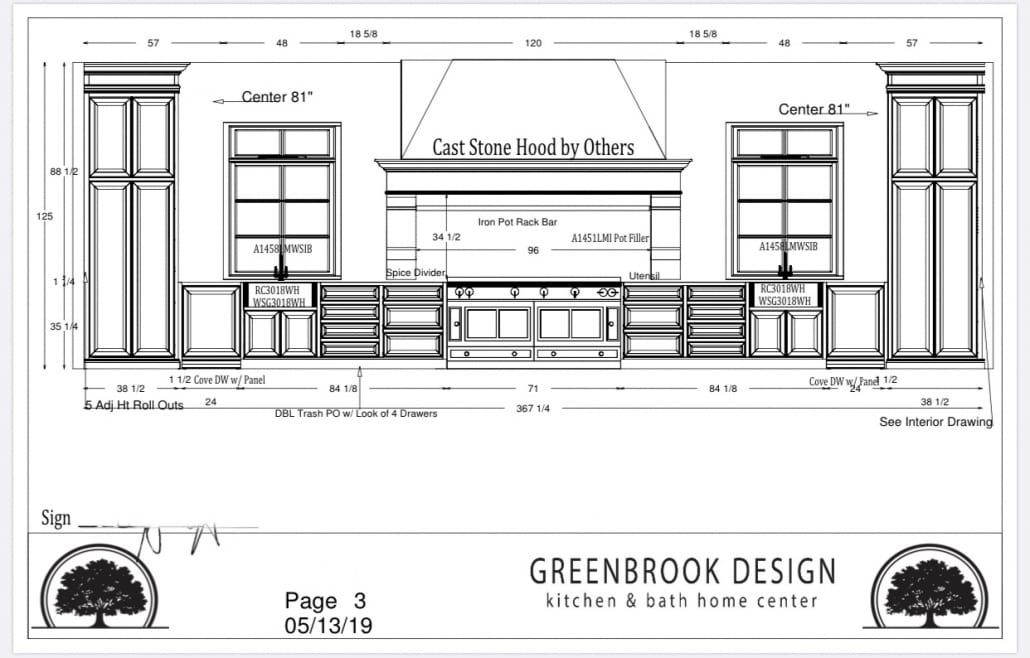
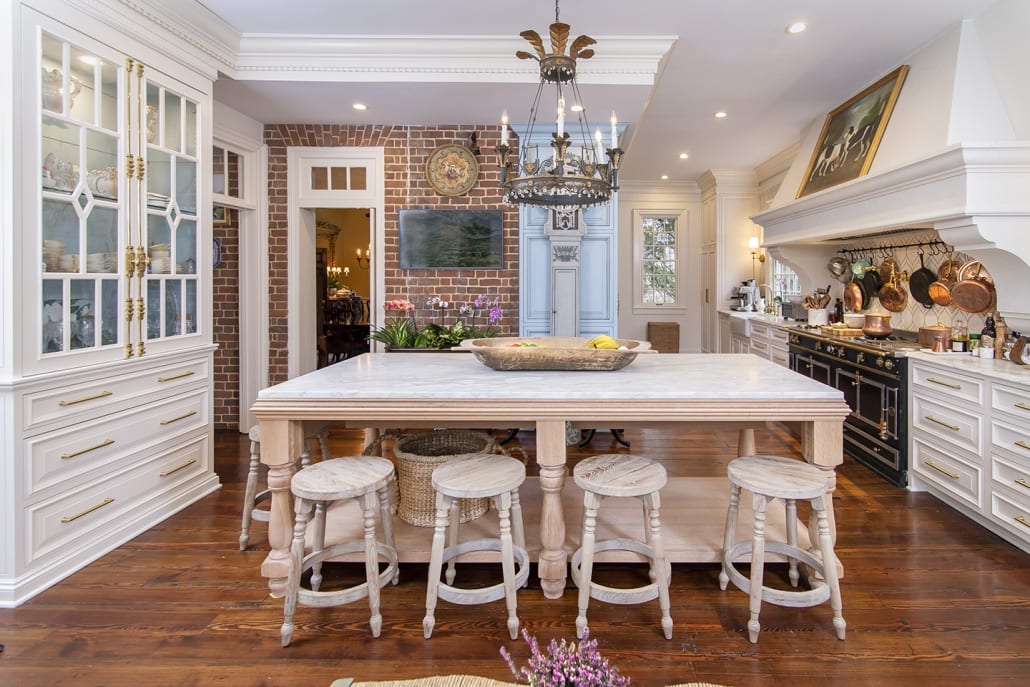
The start of the design process began in the center of the kitchen with the hood over the 71” wide La Cornue French Range. The beautiful call back to the old world style set the tone for the rest of the kitchen.
Creating Symmetry
We used the cabinets to create symmetry in the room by using two sinks under the windows. From here we filled in the spaces from wall to sink cabinet and sink cabinet to range with what the client needed. They chose to use two large pantry cabinets on the walls to optimize storage and we had room for two dishwashers as well. Between the sink and range, they were able to get a double set of drawer cabinets.

Range Wall
To recap, that’s two sinks, two dishwashers, two pantry cabinets, and fourteen drawers and zero fillers or wasted space. Only custom cabinets by Walker Woodworking could have achieved this level of customization and give the homeowner exactly what they wanted and needed.
Refrigerator and Washer & Dryer
Now we still have to find an area for the designer column sub-zero refrigerator and freezer units – each are 30″ as well as washer and dryer.
On the wall opposite the left window, we made an area that looked more like the furniture to house the refrigerator and a stacked washer and dryer, all hidden behind the cabinets.

Hutches & Farm-style Island
Even with what we had already placed in this space there was still room to add two hutch cabinets and a farmhouse-style island. Both added elegance and charm to the already beautiful design not to mention extra storage and seating areas.
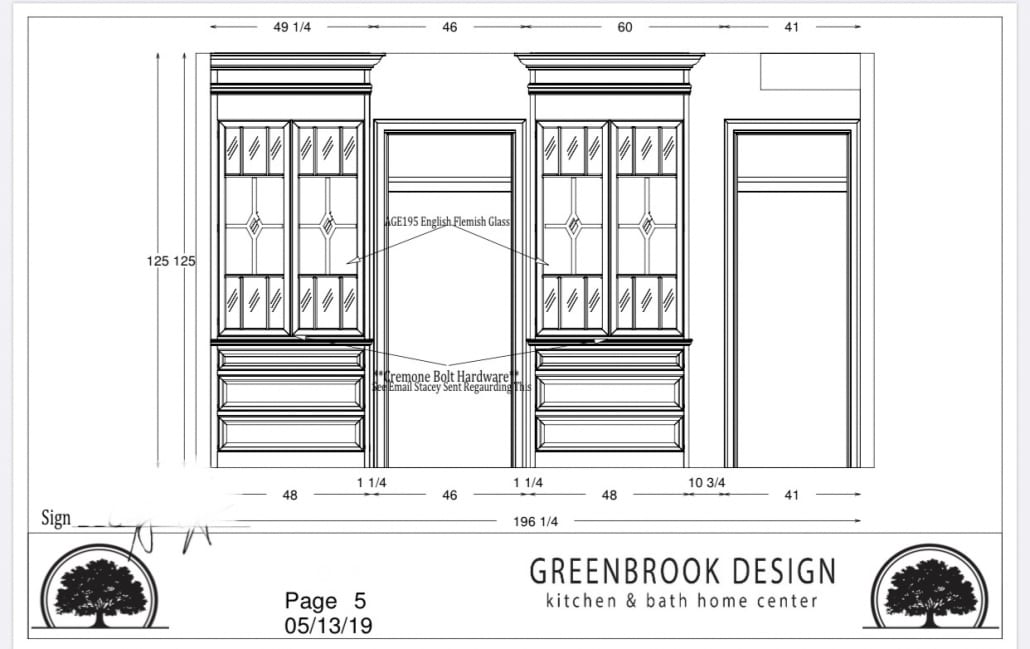
Double hutches flanking the entry to the living room.
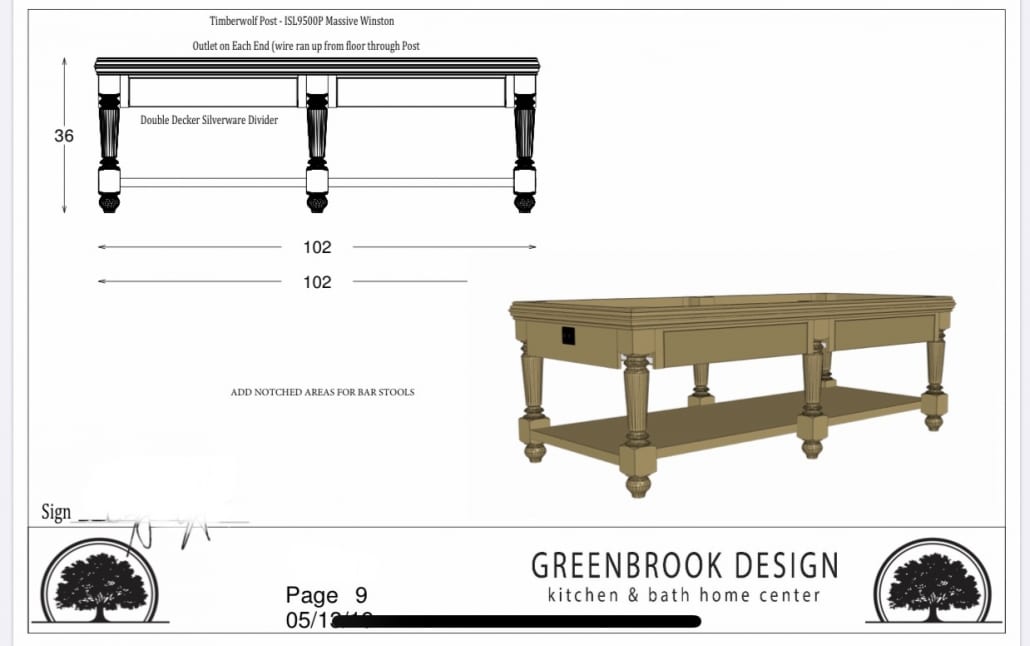
Classic Farm-stle Island
Design Challenge: Style English Farmhouse
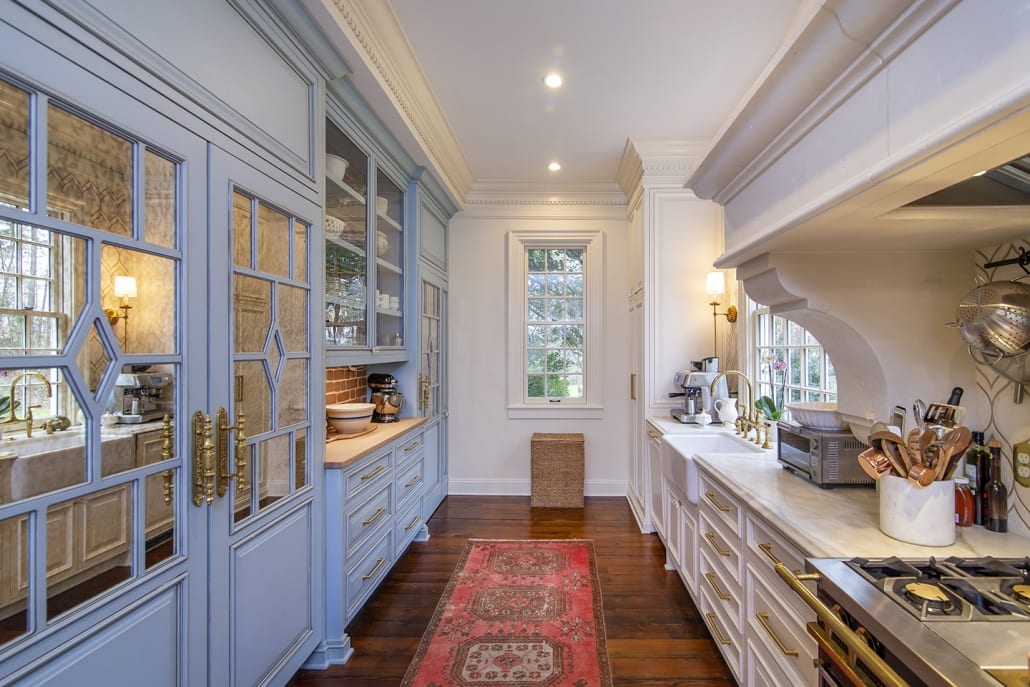
Once we had the cabinet layout details done, it was time to move into the next part of our goal which was to create a look that represented an English Farmhouse style. The remaining finishing touches were mostly cabinet finish selections. With some guidance and creativity by our in-house design team, we were able to offer the homeowner several unique options. Using the redesigned floor plan, the walls had been removed down to the exposed brick of the original home. Originally, the client wanted to use a shade of green which would have complimented the white that she had selected really well. However, we just couldn’t settle on a color that looked good with the exposed brick. Our next option was a shade of blue that could be painted and glazed that complimented the exposed brick. The team at Walker woodworking made a few samples using colors the design team selected and some photo inspiration to get the glazing perfect. We will let the photos speak for themselves.
Completing the look
For the final step, we needed to design an island that reflected a farmhouse style from the early 1800s. We believed the island was the perfect piece to bring in natural wood tones that looked weathered and aged by using quarter sawn white oak and a cerusing technique.
On the hutches, we used antiqued glass and cremone bolts which compliment the gold hardware used throughout the kitchen.
The Calcutta gold marble countertops and patterned tile completed the look. The homeowner accessorized everything beautifully for the finishing touches.
While this project presented us with several unique challenges, it was a wonderful experience that allowed us to explore so many creative ways to blend the old world with the new. The end results were more than just checking off boxes, there was a satisfaction that came from knowing we were able to bring this homeowner’s vision to life. Click here to see the full project.

